
In the Microsoft technology stack, the domain controller provides core identity services to your business network. As such, the loss of a domain controller can create a denial of service (DoS) and bring your network services to a grinding halt.
I’ve identified three ways you can back up the System State of a Windows Server 2016 domain controller. The good news here is that the process hasn’t changed from Windows Server 2012 R2.
What is the System State?
Windows Server computers (physical or virtual) have a data collection called the System State that can be backed up specifically by the systems administrator. Depending on the server’s infrastructure role, different data may comprise that machine’s System State. The System State consists of the following files:
- Active Directory database (domain controllers)
- Sysvol shared folder (domain controllers)
- Certificate Services database (certification authorities)
- Cluster database (failover cluster nodes)
- Boot files, system files, and files covered by Windows File Protection
- Windows Registry
- Performance Monitor counter configuration data
- Component Services class registration database
Note: the following methods are presented no particular order.
Method #1: Windows PowerShell
Open up an elevated Windows PowerShell prompt on your server and run the following command to install the Windows Backup cmdlets:
Install-WindowsFeature -Name Windows-Server-Backup -IncludeAllSubfeature -IncludeManagementTools
This process won’t require a restart. You can enumerate all the backup commands like so:
Get-Command -Module WindowsServerBackup
The following script will create a System State backup of the local server and save the backup to my F: data volume. You’ll notice that I’ve commented on every line so you can easily see what’s going on.
NOTE: Here I focus only on backing up the System State. You can perform other file system (or even system image) backups on your servers. And, you can make use of such tools as Task Scheduler or AT.EXE to schedule your backups.
#create the backup policy
$policy = New-WBPolicy

#back up the System State
Add-WBSystemState -Policy $policy

#declare the backup location as my F: volume
$target = New-WBBackupTarget -VolumePath "F:"

#add the backup location to the policy
Add-WBBackupTarget -Policy $policy -Target $target

#start the backup
Start-WBBackup -Policy $policy
Method #2: Windows Backup
If you’re not a PowerShell fan, then you may want to use the graphical backup utility that has shipped with Windows Server since the very beginning. Follow the procedure in the previous section (no escaping PowerShell completely, I’m afraid) to install the Windows Backup feature.
You can then start the Windows Server Backup Microsoft Management Console, as shown in Figure 1.
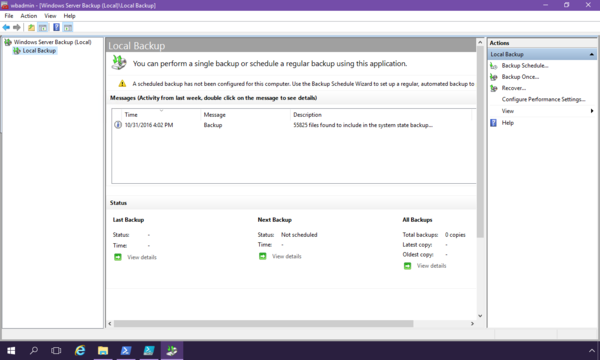
Select Local Backup from the Console pane, and then in the Actions pane, click Backup Once to start the Backup Once Wizard. You’ll complete the following steps:
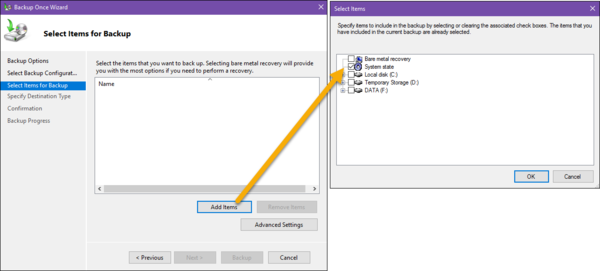
Choose the Custom backup option
Select the System State to back up (shown in Figure 2)
Decide whether you’re backing up to a local or remote volume
Method #3: Microsoft Azure
This procedure will work only if you have an Azure subscription. Then, the first thing you need to do is to log into the Azure Portal (portal.azure.com) and create a Recovery Services vault.
Second, you create a Backup object inside your vault, as shown in Figure 3.
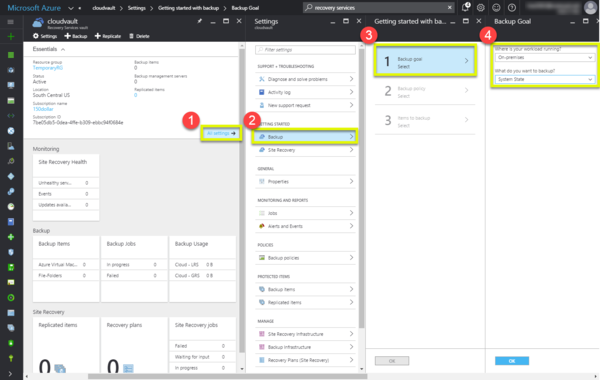
After specifying to Azure that you want to back up the System State of an on-premises virtual machine, you’ll be prompted to download and install the Microsoft Azure Backup agent.
The bad news is that this „agent“ is actually a full-fledged server, based on Microsoft Data Protection Manager (DPM), whose download comprises 3.2 gigabytes and that requires a SQL Server instance for installation.
After you get the Azure Backup Server installed, you’ll need to register your Windows Server 2016 domain controller with your Azure vault. Finally, you’ll use the Azure Backup Server user interface to send your System State backups to the Azure cloud